
In this series of posts we are going to show this points:
- Setting up the envierontment
- Understanding a web service
- How to define the web services operations in a template class
- How to create the web service using maven and the template class
- How to package the web service using maven and deploy it.
- How to test the deployed web service using maven.
The first thing to do is set up the necesary environtment to create the web service. Download the next sofware and configure the environment variables:
• Java SDK version 1.6.0_45 or later.
• Windows environment variable JAVA_HOME pointing to Java location (C:\Program Files\Java\jdk1.6.0_45)
• Eclipse IDE version 4.3 Kepler or later.
• Apache Maven version 3.1.1 (Embedded in IDE or installed in local machine to use it in command line console).
• Add the apache Maven bin directory path to the Windows environment variable Path
• Apache Ant version 1.9.4, installed in your local machine.
• Add the apache Ant bin directory path to the Windows environment variable Path
• Apache axis2 version 1.6.0 (binary distribution). Libraries XMLBeans version 2.3.0 and axiom version 1.2.11 are included in axis2.
• Windows environment variable AXIS2_HOME pointing to Axis2 location (C:\axis2-1.6.0)
• WSO2 application server version 4.0.1 to deploy Web services. (you have to download the version 5.0.0 in the download page)
The next step is check if all the elements are properly installed.
JAVA
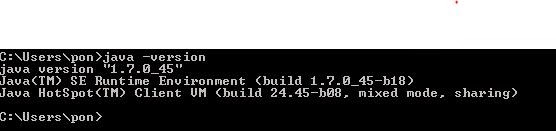
Open a dos command window and execute java -version
ECLIPSE
Execute the eclipse.exe in your eclipse installation

APACHE MAVEN
Open a dos command window and execute mvn -version

ANT
Open a dos command window and execute ant -version

AXIS2
Open a dos command and execute echo %AXIS2_HOME% and check that path y correct.

WSO2 - Application Server
Open a dos windows and run the server using this command.
[WSO2-Installation-folder]/bin/wso2server.bat

Open browser and copy the url that appears in the last line of the output
Enter user admin and password admin

If you are here everything has going ok.
• Windows environment variable JAVA_HOME pointing to Java location (C:\Program Files\Java\jdk1.6.0_45)
• Eclipse IDE version 4.3 Kepler or later.
• Apache Maven version 3.1.1 (Embedded in IDE or installed in local machine to use it in command line console).
• Add the apache Maven bin directory path to the Windows environment variable Path
• Apache Ant version 1.9.4, installed in your local machine.
• Add the apache Ant bin directory path to the Windows environment variable Path
• Apache axis2 version 1.6.0 (binary distribution). Libraries XMLBeans version 2.3.0 and axiom version 1.2.11 are included in axis2.
• Windows environment variable AXIS2_HOME pointing to Axis2 location (C:\axis2-1.6.0)
• WSO2 application server version 4.0.1 to deploy Web services. (you have to download the version 5.0.0 in the download page)
The next step is check if all the elements are properly installed.
JAVA
Open a dos command window and execute java -version
ECLIPSE
Execute the eclipse.exe in your eclipse installation
APACHE MAVEN
Open a dos command window and execute mvn -version
ANT
Open a dos command window and execute ant -version
AXIS2
Open a dos command and execute echo %AXIS2_HOME% and check that path y correct.
WSO2 - Application Server
Open a dos windows and run the server using this command.
[WSO2-Installation-folder]/bin/wso2server.bat
Open browser and copy the url that appears in the last line of the output
Enter user admin and password admin
If you are here everything has going ok.


